A better alternative to a pole display?If the monitor on your register is positioned so that customers can see it (and they are close enough to be able to read it) then a secondary display is not needed. However if the back of the monitor is toward the customer, or the register is on a back counter too far away for customers to read it, then a secondary monitor may be a swell idea.
Standard pole display.
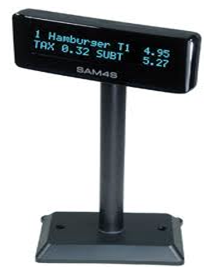 They come in various sizes and most will usually display 2 lines of text with 20 characters per line. My POS software will support many Logic Control brand pole displays that plug into a serial port on your computer but not the "by-pass" type. Here is the section of the manual for setting up a pole display http://keyhut.com/postip3a.htm#pole Well that's great, why not use a standard pole display?
1. Cost. A new display will cost about $200 or more. However one advantage is startup. In the morning all you have to do start the pole display is to turn it on and run my POLE.EXE in the background of my POS.EXE program.
But there is a better idea.
Using a second monitor as a pole display. This would require a second computer with a monitor. You would use the BIGPOLE program that comes with my POS software to do this.
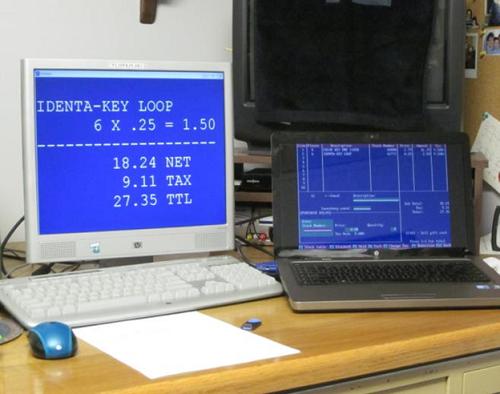
In this photo both monitors are driven by the laptop. The second method would be to use a second monitor attached to a second VGA port on your computer. Most laptops already have a VGA port and you can purchase a card for a desktop computer to provide another VGA port if your computer does not have one. The BIGPOLE.EXE program will drive the second monitor.
Links to purchase a dual VGA PCI card.
http://www.tigerdirect.com/applications/SearchTools/search.asp?keywords=dual+vga+pci+card You can also get a USB to VGA adapter. Search on Google or Amazon for USB TO VGA ADAPTER. This is much easier to install than a VGA card and you do not have to worry about the type of card slot your computer has. However this will require the purchase of a monitor and / or a second VGA port of you do not already have them. Figure $250 to $300 or more for both.
USB monitors.
 This will not require a second VGA port and just about everyone has a spare USB port. Also the display is powered (usually) by the USB port, this means that you will not have to plug in a power supply. The monitor you would want would be a 7 inch, non-touch screen, with a resolution of 800 X 480 or 800 X 600 pixles. Here are some links for compatable monitors...
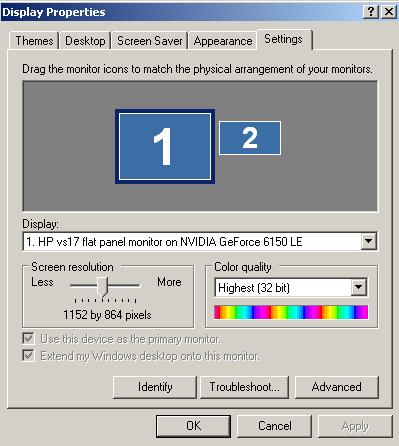
Mimo UM-760 7'' LCD Monitor, Black (Non-Touchscreen) from Amazon Mimo UM-760 7'' LCD Monitor, Black (Non-Touchscreen) from Mimo DoubleSight 7" LCD Monitor - DS-70U from Staples DoubleSight 7" LCD Monitor - DS-70U from Amazon DoubleSight 7" LCD Monitor - DS-70U from Walmart Or you can do this Google search for 7 inch monitor. PLEASE NOTE: By "compatable" I mean that I have looked at the specifications of each monitor listed above and the specs indicate that the monitor should be compatible with my software. However I have not purchased each monitor and actually tested it out. Remember that my software is FREE meaning that there is no money coming in for me to purchase and test stuff for you. I do have an older model Mimo monitor and I actually use that, so I do know the software works with a 7" USB monitor. I have not listed prices for each monitor because the vendors will probably change the prices over time. However on 1-14-17 the prices varied from about $90 to $160. This is still cheaper than an actual new pole display and the monitor has more display options. Since I do not update the above links often it is possible that a listed monitors have been discontinued and the link for it may be dead, sorry. If you do decide to use one of these monitors and later you no longer need it for POS purposes it still makes a nifty add-on to your computer. I use one for the DHPOS chat room. The chat room is on the 7" while I use the main monitor for regular computer stuff at the same time. Setting up 2 monitors on the same computer in Windows XP. Hook up a second monitor to the computer. Install any CDs or drivers that came with the monitor. During setup or initial installation your screens (both) may flicker or go black for a few moments, this is normal. It is not normal if this persists for 2 minutes or more. Right click on the desktop. Click on [Properties] A "Display Properties" window will open. Click on [Settings] The window will change and if your computer is recognizing the second monitor it will display 2 rectangles at the top labeled 1 and 2. #1 is your main monitor and #2 is your new toy. Click on #2 to set the screen resolution and color quality on your new monitor and check the box for "Extend my desktop onto this monitor. You can also move monitor #2 to top, right, bottom, or left of the main monitor by dragging it with the mouse. This is important because to move a window from the main monitor to the #2 monitor you will have to slide it in the direction you set. Click [Apply] Setting up 2 monitors on the same computer in Windows 7 and later. Hook up a second monitor to the computer. Install any CDs or drivers that came with the monitor. During setup or initial installation your screens (both) may flicker or go black for a few moments, this is normal. It is not normal if this persists for 2 minutes or more. Right click on the desktop. Click on [Screen resolution] A "Display Properties" window will open.
 The window will pop up and if your computer is recognizing the second monitor it will display 2 rectangles at the top labeled 1 and 2. #1 is your main monitor and #2 is your new toy. Click on #2 to set the display resolution, orientation. And set multiple displays to "Extend these displays. You can also move monitor #2 to top, right, bottom, or left of the main monitor by dragging it with the mouse. This is important because to move a window from the main monitor to the #2 monitor you will have to slide it in the direction you set. Click [Apply]
NEW SOFTWARE
 This program has 5 display modes. Modes 1 and 2 are 6 lines of very large text that will show only the last item purchased plus the totals for net, tax, and total. Modes 3 to 5 are 16 to 25 lines of text and will show the last several items purchased plus the totals for net, tax, and total. As you can see modes 1 and 2 are almost identical and so are modes 3 to 5. However they are all slightly different and different modes will be the optimal choice for different monitors and resolutions. Modes 2 and 4 accomodates the 800 X 480 screen resolution by printing fewer lines in the window leaving the bottom of the window blank. This is fine because if you are using an 800 X 480 monitor the bottom of the window is off the screen. Modes 1 and 5 are for 800 X 600 or larger monitors. Since you can set a PATH in BIGPOLEQ.EXE you do not have to extract the files into the same folder as your DHPOS program files. You can put them into a new folder so that way you just have to delete the folder if you later want to get rid of this program. So far 1 beta-tester of this program has told me that running POS.EXE and BIGPOLEQ.EXE has slowed down his computer so much that BIGPOLEQ.EXE is unusable. For everyone else it runs just fine. However it will be a really good idea to start both POS.EXE and BIGPOLEQ.EXE in separate windows on the same monitor just to see how they run on your computer. Do this before you run out and purchase any dual VGA ports or monitors. Actually running the program. After you have the dual monitors set up and running on your computer start the BIGPOLEQ.EXE program. It will open in a window. If you press [ALT] + [ENTER] to make the program run full screen there are 3 possibilities that could happen. 1. It will display full screen and everything will be fine. 2. It will display full screen but the image will jump back to the main screen. Press [ALT] + [ENTER] again to restore the program back to a window. 3. One or both screens will go black. Pressing [ALT] + [ENTER] again may restore things or you may have to reboot your computer. NOTE: Pressing [ALT] + [ENTER] on the main POS.EXE program on the main screen will cause the BIGPOLEQ.EXE program to jump back to the main monitor or the main monitor may go black. This is true even if you are running POS.EXE from DOSBox. A better option to get each program to appear in as large a window as possible is to change the resolution of the monitor or in the case of POS.EXE to...
Read the opening screens and after they clear you will see the main program menu. Option #7 allows you to set a PATH to the folder that runs the Cash Register program which contains the sales data that this program displays. A PATH is not required if you are running this program from same folder as your POS program files. If you are running this program from a different folder than the Cash Register program on the same computer, or are using this from another computer over a network, then from this program's menu you must choose option #7. to enter the correct PATH.
You may next choose the display mode you wish to use, options 1 to 5. When you make your choice the menu will clear and the program will display your sales data. If the program comes up with a blank screen it just means that there is no pole data for it to read yet. There will be data when you ring up your first sale. However it also may mean that you entered an incorrect PATH to your sales data. Move the cursor to the top bar of the window and press down on the left mouse button. Now you will be able to slide the window around your screen and more importantly slide it off the main screen onto the second monitor. (Do you remember where you put it when you set up the two monitors in Windows?) Center the window on your second monitor. If the window is too large or too small for your second monitor you may want to return to the dual monitor setup in Windows to change the resolution for that monitor only. If your second monitor displays [TABS] at the bottom that obscure the bottom line data then you must align the top left corner of the window with the top left coner of the monitor. If you press [ESC] when in the BIGPOLEQ program you can go back to the mode menu and pick a better fitting mode. Once you have what you want start the POS.EXE program on the main monitor and start ringing sales.
Quick start.
Moving between programs.
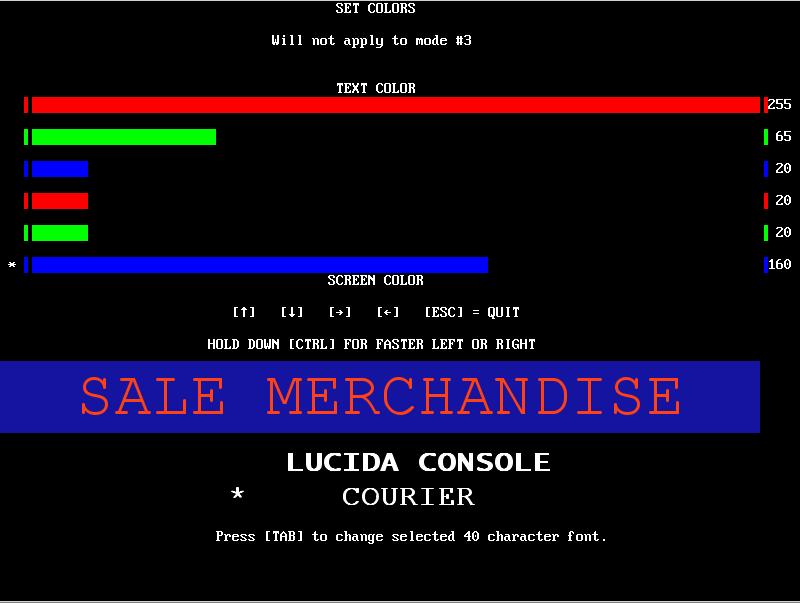
6. Set display colors - Change font On the screen you will see 6 color bars. The top 3 (red, green, and blue) set the text color and the bottom 3 set the screen color. Use the up and down arrow keys to move the asterisk at the left of the color bars up or down. The one with the asterick is the one you can control with the left and right arrow keys. By making a color bar longer you will increase the intensity of that color. If you set all three bars to the same intensity you will range in gray shades from black to white. Color bars of different length will give you shades of different colors. For modes other than mode 3 you can choose between the Courier or Lucida Console fonts by pressing [TAB].
Documentation
Quit.
Since this is relatively new I guess that there should be some feedback for it. But to prevent spam, business proposals from Nigeria, links to porn sites, offers of knock-off watches, viagra, ringtones, etc., and in keeping with my "crappy site" motief, we are going to do it by email. Click on the feedback link below and email your comment to me. By sending me an email with the subject "Big Pole program" you are agreeing to allow me to post your comment here unless you add the text "DO NOT POST" to your email. If I do not think it is spam and it is about the BIGPOLEQ program I will probably post it here. But it will probably take a while to appear. If I think it is spam I will drop it into black hole and it will never see the light of day again. That sounds fair to me.
| |||||
|
Hey Dale, I'm liking the BigPoleQ program! Most notable is the [TAB] quick start feature. Very nice ; ) (maybe posconfg will get this option soon). Exiting the program though seems to require more work than necessary. To close, I've already hit [Esc] > [7] > [Enter]. Why do I then need to hit the Any Key to close the app? My store is open everyday except Thanksgiving. That's 364 extra keystrokes each year to close the Big Pole! And if I take a day off I'm sure to get a call at the end of the day because my clerk can't find the any key! Removing this need will certainly enrich the lives of all who use BPQ and may even save 4 bytes of storage by reducing its size!
Thanks for your hard work, Dale!
| |||||
|
Bruce, I have no idea. This is a QB64 thing. I tried right clicking on the icon, then [Properties] to set the "Close on exit" box but the program does not have that option. I guess that you will have to ask small, he is our QB64 guru. Dale
| |||||
|
If you download this on or after 9-1-12 there is a change. On screen modes 4 & 5 the letters looked a little pale and hard to read. So with help from small302 we made the letters BOLD. This required that we make the letters a tiny bit smaller to fit on the screen but they are much easier to read. A bonus is that you get two more lines on the screen.
| |||||
|
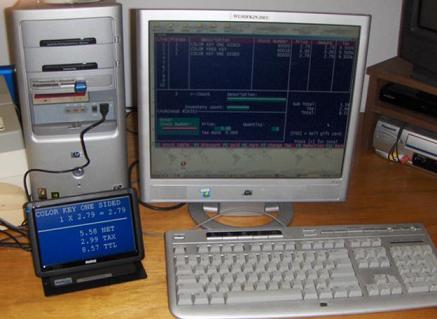
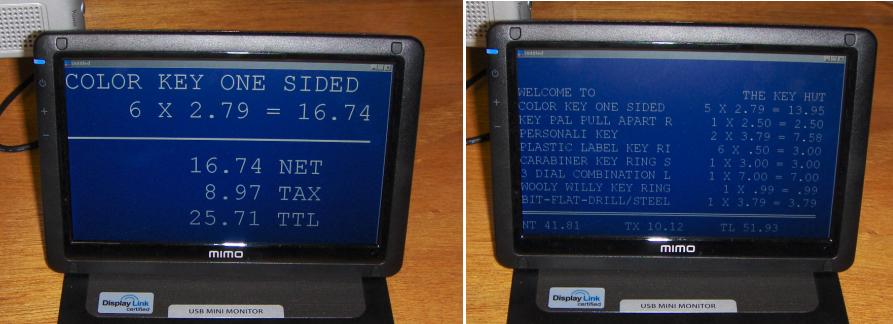
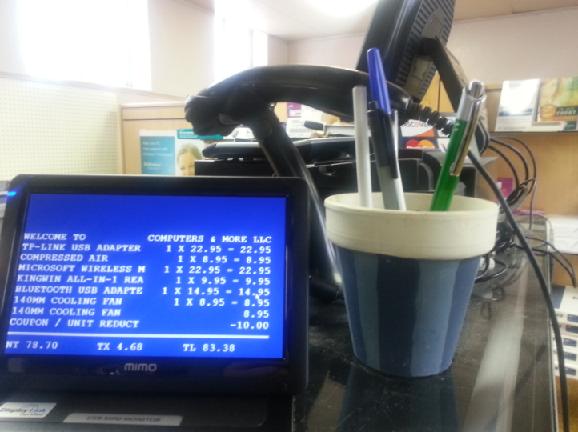
Dale, The BIGPOLE5.exe program is great! We love having a screen facing the customer so they can see the transaction in real time. We took your advice and purchased a Mimo 7� USB monitor. Setup for both the monitor and program was fairly easy, though we found that having the BIGPOLE5.EXE program outside of the point-of-sale software folder made a huge difference in speed. We�ve attached a picture showing the program and monitor in use (if you don�t mind the dust). Thank you again Dale. You rock! Regards. Bill Justesen | Owner | Computers & More, LLC | A Utah Corporation
 |