Updated 1-27-17
Cash Register
 PURCHASE ORDERS
The program PURCHASE.EXE will print out, or save to a text or data file, the stock items in your stock table with inventories so low that they should be reordered. It does this by comparing the value in the INVENTORY column of the stock table to the value in the MODEL column. Stock items with a lower INVENTORY than MODEL will be printed out.
EXTREMEY IMPORTANT! Once you assign a vendor to a slot in the vendor list this program will then file information to that vendor by the position in the list. For example if vendor #12 is Acme Industries then all purchase order information for Acme Industries will be stored by the number 12. If you later switch the slots 12 and 34 then all the purchases previously made from Acme Industries will now be assigned to the new occupant of slot 12 which could be Bebo Incorporated. Always assign new vendors to currently empty slots. It is a good idea to not assign anyone to slot zero.
For the purchase program to function each item in the stock table (that you want to use this program to order for your store) you must fill in the following columns.
STOCK NUMBER
DESCRIPTION
INVENTORY
COST (What you pay to obtain the item)
MODEL (How many you have when fully stocked)
PACK (The minimum you can order)
VENDOR STOCK NUMBER (If you want it printed on the PO)
When you start the PURCHASE.EXE program you will see a couple of screens of instructions and then come to this main menu.
1. Enter header data
2. Create proof sheets
3. Create purchase orders
4. Manual purchase orders
5. Open purchase order file
6. Quit
Main menu
|
Enter header data
If you wish to print actual purchase orders you will have to enter a purchase order "header" for each vendor. To help you the program has this sample header template that you can edit.
BILLING: XYZ CORPORATION             SHIPPING: THE KEY HUT
         ATTN: DALE HARRIS                     9012 E. MAIN ST.
         1234 N. MAIN ST.                      OVERTHERE, IL 66666
         ANYWHERE, IL 60000                    PHONE (773) 555-5559
         PHONE (773) 555-5555                  FAX (773) 555-5550
         FAX (773) 555-5556
                                      TERMS: SHIPMENT MUST BE SENT TO
     TO: ABC COMPANY                  SHIPPING ADDRESS ONLY AND MUST
         5678 S. MAIN ST.             INCLUDE A PACKING SLIP WITH THE
         SOMEWHERE, IL 69999          PURCHASE ORDER NUMBER ON THIS
                                      FORM.
                                      INVOICES MUST BE MAILED TO THE
         PHONE (773) 555-5557         BILLING ADDRESS AND THE PURCHASE
         FAX (773) 555-5558           ORDER NUMBER ON THIS FORM MUST
BE INCLUDED ON THE INVOICE. |
The template and headers are 78 characters wide and up to 18 lines. Only lines from the top to the last non-blank line will be printed. The first step is to edit the template to what you want printed at the top of the first page of each purchase order. If you are using window envelopes you will want the vendor's name and address placed in the header so that it is behind the window when the purchase order is placed in the envelope.
Once you have the template the way you want it you can then select your vendors one by one and press [F1] to drop the template into each vendor's header. You can then edit the template for that vendor by changing the address for the vendor. Of course you can have totally different headers with different terms and instructions of you wish.
Create proof sheets
Proof sheets are to check your inventory against the model stock list before you decide if you actually want to make purchase orders. Proof sheets will not print the headers and will comprise the following columns; stock number, vendor stock number, description, inventory, model stock, order quantity, unit cost, cost all. You can create a proof sheet for all items sorted by vendor or you can choose to create a proof sheet for a specific vendor. Proof sheets will be created at 40 or 80 characters wide depending on how you have set that register on printing receipts. They can be printed on the printer.
Create purchase orders
Purchase orders are created to actually order merchandise from your vendors. You can put them in an envelope, fax them, or email them to have your vendor send you merchandise.
Purchase orders will have the header at the top of the first page. A purchase order number and the order date will be printed under the header and on the top of all following pages. Purchase orders are created only at 80 characters wide and will use the PAGE settings of the "Printer setup" for that computer even if the computer is set up for CONT. printing. If you cannot print the purchase order on this computer then you must save it to a floppy (or other storage device) to print out on a different computer.
Purchase order numbers are 7 digits long. This means that there will be 10 million of them before they roll over to 0000000.
When you create a purchase order it will print on the printer and be saved in a disk file. Each purchase order will use the next sequential purchase order number.
You may select to print one or two copies of each purchase order. If you are mailing the purchase orders to the vendor then you should print two copies so that you have one to file. Yes, paper files are a good idea. Even though this program will electronically file and store each purchase order you should keep a paper record. Purchase orders kept as computer files can be deleted or a file crash can erase them all. (Remember to backup your files frequently.)
Purchase orders will comprise the following columns; stock number, description, order quantity, unit cost, cost all. You may also select to have the vendor stock number printed for each item.
If you choose to use only the stock then each item will be listed on one line. If you choose to add vendor stock number then each item will be listed on 2 lines.
The quantity ordered will be in the units that you sell them. If you sell wire by the meter then you will be told how many meters that you should order, NOT coils of wire. For example if wire comes in 250 meter coils (PACK = 250), and you normally should stock 3 coils (MODEL = 750) then if you have 350 meters of wire in stock you need 400 more meters of wire. However the PACK is 250 so you cannot order 400 meters of wire. The program will round up to the next PACK over 400, which is 500 meters or 2 coils of wire. If your vendor sells wire by the coil (even though you sell it by the meter) then you must make sure that you do not tell him that you want 500 or he will send you 500 coils (or 125,000 meters), way too much. This also applies to things sold to you by weight, case, box, etc. If you order 12 of something will your vendor think that you are ordering 12 pieces or 12 cases?
Rounding up is based on half a PACK. For example if a PACK is 10, MODEL is 40 and you have 36 or more, none will be ordered. If you have 26 to 35 then 10 will be ordered. If you have 16 to 25 then 20 will be ordered. If you have 6 to 15 then 30 will be ordered. If you have 0 to 5 then 40 will be ordered. Assuming you sell none before your shipment arrives you will be with in a half a pack (plus or minus) of your model stock when it does arrive.
Remember that INVENTORY, MODEL, PACK, and ORDER are in the units that you sell them. COST is the price for one unit in the units that you sell them, for example 12.95 is the cost for one piece, not one case, even if they are sold to you by the case (this assumes that you sell them by the piece.)
|
INVENTORY = How many you have in stock now.
MODEL = The minimum number of this item that you want in your store.
PACK = The minimum number that can be ordered, i.e. must a case of 12 be ordered in multiples of 12?
COST = How much it costs you to purchase this item from your vendor. |
Manual purchase order
You may also create manual Purchase Orders. There are 2 reasons to use this program if you have to create manual purchase orders instead of just using your word processor or some other method. First of all it will be much easier to use this program. This program will put the same header at the top of the manual PO that is placed at the top of automatic POs. To enter an item all you have to type will be the stock number and the quantity you want to order. This feature will look up the description and the cost This feature will not allow you to enter an item that is not supplied from the vendor you select. It will not allow you to order a quantity that is not a multiple of the PACK for that item.
The second reason is that the PO will use the next PO# and be filed in the system just like an automatic PO. Since the automatic PO feature numbers the POs sequentially if you use another method to create manual POs you will have to use a different numbering system.
NOTE: Due to the general perversity of DOS the maximum number of different stock numbers you can order in one PO is 8,100. If you need more than 8100 different stock numbers you will have to split your order between 2 POs.
To make a manual PO from the main menu select option "4. Manual purchase orders" then select the vendor you wish to order from. On the next screen when you enter the stock number the program will look up and display the description, current inventory, MODEL, PACK, and the first 24 characters of the vendor stock number. When you enter the quantity you wish to order the line will be displayed on the list on the right of the screen. Only the last 24 items you entered will be displayed. You cannot scroll the list.
If you enter the same item more than once only the last time you enter it will count. For example if you enter 24 pieces for item 123456 and then later enter 15 pieces for item 123456 then only 15 pieces will be ordered for item 123456. This is also how you correct an item. If you order item 654321 by mistake then enter 0 pieces for item 654321 and you will order none, even if previously you had ordered 20.
If you press [F5] you will save the current worksheet you have entered. It is saved by vendor so you can save your work for each vendor and then come back to it later. Saving will not create a purchase order. If you press [F8] you will retrieve the last worksheet for this vendor. NOTE When you retrieve a worksheet it will be displayed in the order the items appear in the stock table, not the order you entered them.
Pressing [TAB] will format a purchase order and display it on he screen. This will not create a purchase order, but just show you what you have entered. Pressing [F1] will create the purchase order and add it to the file. You will then be returned to the main menu.
Press [ESC] to cancel the current work sheet and return to the main menu. Returning to the main menu is also how you change vendors.
Open purchase order file
This feature will allow you to view, print, delete, void, or update your purchase orders in the file. You may retrieve a specific purchase order by the purchase order number. You may retrieve all the purchase orders sent to a specific vendor with a maximum of the last 1000. You may retrieve the last 1000 purchase orders placed to all vendors.
|
Display
1. Enter PO #
2. Pick vendor
3. Unpaid orders
4. All purchase orders
5. Quit |
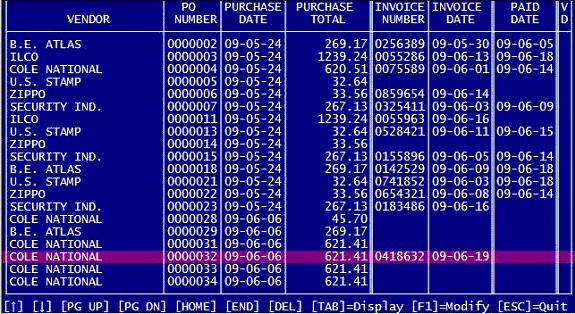
From the above menu you may call up a specific PO, all the PO's from a specific vendor or all the PO's in the file.
When you are at this screen you can do several things once you highlight the purchase order you want.
If you press [TAB] you can put the full purchase order up on the screen. From there you can reprint the PO or save it as another text file that can be loaded in to any word processing program.
Pressing [DELETE] will allow you to delete the purchase order after a prompt. Pressing [CTRL]+[DELETE] will immediately delete the PO. Deleting PO's is a good idea. As the number of PO's in the file increases the program will take longer and longer to perform various functions. And of course all those PO's will take up space on your disk drive. I really cannot see any reason to keep them for years.
If you press [F1] this window will appear this will allow you to add the listed information to the purchase order. This information will also appear on the top of purchase order reprints.
PRICE CHECK
If you are running networked cash registers you can place additional computers out on your sales floor that customers may use to check prices and quantities in stock on items you stock. Press [F1] the check gift card balances.
To do this, connect additional computers to your network and run the program file LOOKUP.EXE. You must enter into the program the network PATH to the global folder on your server that holds your shared data files. It will be the exact same PATH that you entered into the "Network" feature of the POSCONFG.EXE program to set up each register to run over the network.
When you created your register you had to give your register a filename. You must also enter this filename into the LOOKUP.EXE program.
If you enter a password then the customers will not be able to exit this program or access its settings. When the program is actually looking up items press [ESC] to go to the program's menu. If you have entered a password then you will have to enter it before you can leave the "Price check" screen.
You may enter up to 3 pages of instructions for your customers to follow to use this program to look up items. I do not know what computer equipment you will be providing so it is up to you to write the instructions. Will you be running this on a laptop or desktop computer? Will you be providing a scanner? Make sure you tell them to press [ENTER] after typing in a stock number. Tell them how to find the stock number on your items. Are you using price stickers with the stock numbers on them or are you using the barcode numbers as you stock numbers?
You may use the 3 pages of instructions to write really long detailed instructions or you can use each page to write instructions in different languages. For example use page #1 for instructions in English, page #2 for instructions in Spanish, and page #3 for instructions in Polish. Make sure that you tell the customers to press either [PAGE UP] or [PAGE DOWN] to access other pages. Of course if the other pages have instructions in different languages you would want to post that information on the current page in the language of the other pages like from the English page you would print...
[PAGE UP] = Instrucciones en Espańol
[PAGE DOWN] = Instrukcja po Polsku
When entering instructions you can enter accented characters by first pressing [F3] to display the "Alternate character set." Each character will have a 3 digit number to its left. To actually type in an alternate character hold down [ALT], use the numeric keypad on the right of your keyboard to type in the 3 digit code, and then when you release the [ALT] key the alternate character will appear in your text.
Once you have entered the required information you may select to "1. Go to the lookup screen." Now customers can type in stock numbers to check on prices and quantities in stock. Press [F1] the check gift card balances.
You may set up the program to lookup either regular stock numbers, vendor stock numbers, or both. If the program can check for both, it will lookup regular stock numbers first. If it finds a match it will then ask if you want to also look in the vendor stock numbers.
When checking vendor stock numbers you do not have to enter the entire stock number. If you enter just part of a vendor number the program will find the first vendor stock number that contains that part and then ask you if you want to continue to search.
Previous page | Table of contents | Next page
CASH REGISTER HOME