Updated 1-27-17
Cash Register
 Time Clock
If the file TIMECLOK.EXE is in the folder with the other POS program files you may press [F5] from the main menu of the POS.EXE program to access the time clock. If you remove the TIMECLOK.EXE file from the folder then pressing [F5] will do nothing and you will not be able to use the time clock feature. The time clock will run over a network and all registers on the network will access the same time clock. If you are using this program over a network the program file TIMECLOK.EXE will still have to be on any register from which you wish to use the time clock. The time clock uses the system clock of whatever register is being used to access the time clock feature. Make sure that all registers on the network have the system clock set to the correct time.
When you enter the time clock program it will ask you for your PIN number. Even if you do not use PIN numbers when running the register the time clock will require a PIN number for each employee. The purpose of PIN numbers is to make sure that only the employee can punch the time on his time card. After entering the proper PIN number the program will go to that employee's time card.
Note: All 56 possible employees will have their time card stored in the same file. The first time someone tries to access a time card in a new week the program will create a new file. This is automatic and you will not have to create this file. The filename for the file will consist of Saturday's date (or Sunday's date if you select to make Sunday the last day of the week) in YYYYMMDD format followed by ".CLK". For example if someone tries to punch in on Monday, March 9th, 2009 and no file exists the program will create the file 20090314.CLK. This file is stored in a sub-folder with the same name as the register file. For example if you store your POS program files in the folder C:\POS and your register's file name is KEYSHOP then the time clock files will be stored in the folder C:\POS\KEYSHOP. If you run the POS program over a network the time clock files will be in a sub-folder to the GLOBAL folder on the server.
When a new time clock file is created the current employees names and ID numbers will be added to the file. If during the week new employees are added their names and IDs must be manually added to the time card file using option "3. Associates" from the time clock program's supervisor menu.
Time card
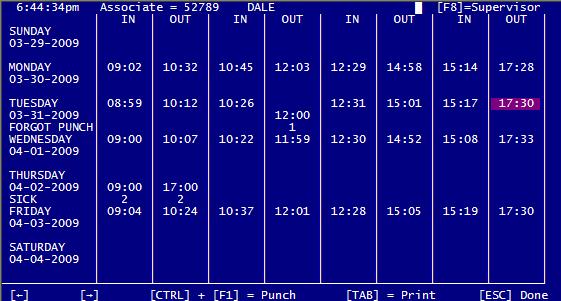
Time cards always run from Sunday to Saturday. When the employee opens his time card he will be restricted to only the current day. He may use the left and right arrow keys to choose which column to punch in the current time. When the light bar is in the correct place, punch the time by holding down the [CTRL] key and pressing [F1]. Once a time has been punched it may not be changed.
While viewing the time card it may be printed out by pressing [TAB] assuming that the register has been setup to print receipts. You can press [+] to display the daily total hours and the total for the week.
SUPERVISORS
Supervisors will have access to additional features of the time clock. When the time clock is first used no one is a supervisor. This will allow anyone to have supervisor access so the first thing you will want to do is press [F8] from a time card to access the Supervisor Menu.
     Supervisor menu
1. Correct time punch
2. View time cards
3. Associates
4. Transmit time cards
5. Delete time card
6. Store # / Time display
7. Quit |
By choosing option 3 you will see a list of employees. To make an employee a supervisor highlight the name and press [TAB]. Supervisors will have an asterisk placed to the left of their names. Once one or more employees have been made supervisors, only those employees will be able to access the supervisor menu.
Correct time punch.
This feature allows a supervisor to over-ride a time punch that may be incorrect or missed. When this feature is entered you must select the time clock file you wish to alter. Only the last two files may be selected. You then choose the employee time card you wish to access. While you may not change the actual time punch you will be able to enter a new time under the punch that will over-ride the actual punch. Under the correction the supervisor's number will be printed.
  Time punch ' 12:23
Corrected to ' 12:28
Corrected by ' 4 |
When time worked is calculated normally the time punch will be used. However if there is a correction then the correction will be used.
By pressing [TAB] you will be able to enter the reason that the time was corrected. This also allows the supervisor to enter time for sick pay or vacation time, or any other reason. For example if an employee is due a day of vacation then a supervisor can enter the first time in as 09:00 and the following time out as 15:00 (8 hours) and enter the reason as "VACATION". If you print a time card at 40 characters per line the "reasons" will be printed on one line at the bottom of the card. In this case only the first 4 characters of the reason will be printed.
View time cards
This feature will allow a supervisor to load any time clock file and view any time card in the file. By pressing [TAB] you may print the displayed time card, save the card as a text file, or save the card as a comma delimited file that can be loaded into a spread sheet program like Excel. You may also select to automatically print or save all cards that have data on them. If all cards are printed or saved at once they will be saved into one file. However only cards that have data will be printed or saved, blank cards will be ignored.
If you save cards as a file you can save them to another drive by changing the drive letter or if you do not change the drive letter they will be saved to the folder that stores the time card files.
  Save file as...

       YYMMDD
   C:09032801.TMT

[TAB] = Change drive
    [ENTER]=Save
[ESC]=Cancel |
The standard file name used will be the Saturday date for the week followed by the card number (or AL if all cards are being saved) followed by the extension of .TMT for a text file or .TMD for a data file. However you may type in a different file name if you wish except for the extension. A sample file name would be 09032801.TMT for the first card in the 20090328.CLK file.
Associates
This feature will allow you to add or correct an associate's name, ID number, and if the associate is a time card supervisor. When a time card file is created this information will be added to the new file. However if an employee is added during the week the new information will not be imported to an existing file. You must use this feature to add new employees to an existing time card file. Adding a new employee to the time card file will not add that employee to the main POS program. You must add him in both files and you must make sure that the new employee is added to the same line number in both files. PIN numbers can only be added in the POS.EXE program. You can only use the "Associates" feature in the time card program to enter the employees' ID and make the person a time card supervisor.
It is important that you do not add a new employee to the same line in the employee list that was used by a previous employee until the previous employee has been gone for at least 2 months.
While you are in this feature you can press [F5] to set up the program so that it requires the PIN number of a supervisor to access the time clock program. For this to actually take effect at lease one person must be a supervisor. This will mean that an employee cannot punch the time card unless a supervisor presses [F5] from the POS program and then enters his PIN. The employee would then enter his PIN.
If the last supervisor quits, gets run over by a kid on a big wheel, or transported to an alternate universe then you will not be able to access the time clock. Well you could make a new employee use the same slot as a former supervisor, go to the "Employee setup" feature of the POSCONFG.EXE program and delete the old PIN for that slot. Then have the new employee enter a new PIN in the POS.EXE program to make him a supervisor. But that is a pain.
Transmit time cards
This feature will create a text file or data file of your time cards that can then be sent over the internet by either email or FTP file transfer to any destination you wish. ALL non-blank cards will be the file. Transmitting files requires an internet connection and Windows '95 or higher.
The file will be placed in a \SEND folder that will be a sub-folder to the folder that holds your 'Cash Register' program files. For example if your 'Cash Register' program files are in the folder C:\POS then the files to be transmitted will be in the folder C:\POS\SEND. If you also use the feature that transmits the 'Automatic Reports', all the files in the \SEND folder will be transmitted when the register is closed.
Unlike the automatic reports you must come here to create a file of time cards to transmit every time you wish to transmit cards.
The file name used for the transmit file will consist of the store ID, followed by the date of the file, followed by either .TXT or .CSV depending on the file type. If the store ID was 88-2138 and the time card file you wish to send was 20090328 then the file will be saved in the /SEND folder as either 88-213820090328.TXT (a text file) or 88-213820090328.CSV a comma delimited data file.
If you are not using the "Automatic Reports" transmit feature then you will have to transmit the files manually as an attachment to an email or using your own FTP software.
Delete time card
This feature will delete entire time card files. However you cannot delete the current file.
To delete a file highlight the file you want from the list and press [DELETE]. Then press [F1] to actually remove the file or [ESC] to cancel. Deleted files cannot be recovered.
NOTE: This program can only store 525 (10 years worth) of time card files. If you try to store more than that the program will crash.
Store # / Time display
In this feature you may enter a store ID for your store. This is useful if your store is part of a chain and you need to send the time cards or time clock file to your home office. By entering a store ID they can tell which is yours. Since the store ID will become part of the file name do not use characters in your store ID that cannot be used as part of a file name.
Store ID's are always 12 characters long. If you enter a store ID shorter than 12 characters then the will be preceded by the number of zeros required to make them 12 characters long.
By pressing [TAB] you can toggle between printing / saving to file the time stamps in a HOURS:MINUTES format (09:50 = 9 hours and 50 minutes) or a DECIMAL TIME format (09.50 = 9.5 hours).
If printing is set to 40 characters per line the time stamps will be printed without the "." or ":" separators to allow 8 of them to fit on one line. This means that 1252 could mean 12 hours and 52 minutes or 12.52 hours depending on how you set up displaying printed time stamps.
Here is where you may select Saturday or Sunday as the last day of the week. This should be the very first thing you do when using the "Time Clock" feature for the first time and then leave it alone if you can. Since the file name for each time clock file is derived from the last day of the week changing it will create a new file. For example if you were using Saturday as the last day of the week and the current file is 20090613.CLK and you change to Sunday, the current file will become 20090614.CLK, a totally different file. When the 20090614.CLK file is created data from the 20090613.CLK file will not be transferred over to the new file. This is one reason that when you change the "end of week" that you will automatically be returned to the "Cash Register" program and must re-enter the "Time Clock" program.
Start other programs from POS
It is possible from the main menu of the POS.EXE program to press [F4] to exit the POS program, run the other program, then return to the main menu of the POS.EXE program. This can be used to accomplish some task that the POS program will not do. The other software file must be in the POS folder with the POS program files.
However only other programs written for this procedure will perform it. The other software to be run must be DOS software. Trying to run non-DOS software using the [F4] method will usually exit the POS program but not start the program you are trying to run. In effect the POS program will just quit with no error.
All DOS software will start, however when you exit the other software you will not be returned to the POS program at all, the other program will just quit. To return to the POS program the other program must terminate by calling the POS program using the command RUN "POS" This is completely unlikely for software not written specifically to be used with my POS software. This means that either I will have to write the software for you, you will have to write it yourself, or a 3rd party will have to create it. Currently there are two program files that will work with the [F4] key. TEXTREAD.EXE allows you to open any text report in the folder, and then read, print, copy, or delete it. It will not allow you to edit the report. CLOSECNT.EXE will help you add up the cash drawer when you close the register and print. These files come with the rest of the POS software and will be in your POS software folder.
If you have an application in mind, and you cannot write it, and know no one to write it for you, then you can ask me to create it. If the application is something that I believe a large proportion of users would want then you may be in luck and I will do it as soon as I have time, and do it for free. If it is something that I think only you would want then you can make me an offer. However if I do write the program for you, you will have to pay for it. The program will be uploaded onto the "3rd party" page of my website and anyone will be able to download it for free.
To setup the POS program to use the [F4] key to run other software there are two methods. You can create a NEXTFILE.DAT file in the POS folder that only contains the name of the program you want to run. When [F4] is pressed from the POS menu the program will search for the file name in NEXTFILE.DAT and then run the program. NOTE: do not include the extension .EXE in the file name contained in NEXTFILE.DAT. NEXTFILE.DAT must be a plain text file.
Well that is fine but what if you have two or more programs that you want to run? In that case start the PROGRAMS.EXE program. This program will allow you to enter the file names and program names / descriptions for up to 9 different programs. It will also write the NEXTFILE.DAT file for you with the filename of PROGRAMS. Now when you press [F4] from the POS menu the PROGRAMS program will start. NOTE: Whenever you want to edit the program names and descriptions that have previously been entered, or enter new ones, you must run the PROGRAMS program directly, not by using the [F4] key.
When you press the [F4] key from the main POS menu if you have entered no filenames PROGRAMS will return you to the POS menu. If you have entered only one filename PROGRAMS will run that program. If you have entered 2 or more filenames PROGRAMS will let you pick the program you want to run or press [ESC] to return to the POS menu.
NOTE: If you are running multiple register files you can use PROGRAMS to setup a different set of programs to run for each register file. However if you put the name of the program you want to run into the NEXTFILE.DAT file then all register files will share that program.
Receipt data file
Many folks have asked if there is a way that the data from
transactions can be accessed so that they can write their own software
to manipulate the data, make their own reports, etc.
To do this you can run the REC2CSV.EXE program file. This program
will read transactions from the file of past transactions (the ones you
can access from the '5. Voids' feature of the main Cash Register program
- the .REC file) and will write them to a .CSV data file that you can
then load into any spreadsheet. NOTE: To create the .REC file use the
"Sale recording - VOIDS" feature of the POSCONFG.EXE program.
Only those transactions that are still in the file (if you are saving
a file) will be written. So if you are only storing 100 transactions
then this program can only write the last 100 transactions to the .CSV
file. ALL transactions will be written in the range you choose,
including OPEN, CLOSE, and NO SALE. Most all information in each
transaction will be written.
Why would you want to do this? Well loading it into a spreadsheet
program is not really that useful. However it will give you access to
the data if you wish to write your own software to handle the data for
whatever nefarious purpose you have in mind. This will require that you
can write software or know someone that can. Some labels will be
included in the file to help you parse the information.
You can write all transactions currently in the file, or you can
choose to write only part of the file using the following options…
1. You can write only from the last transaction rung up to a previous
date.
2. You can write only from the last transaction rung up to a particular transaction number.
3. You can write only those transactions that occurred on a specific date.
4. You can write only a specific transaction.
Just remember that you cannot write transactions that are no longer
in the file. If you are saving only 100 transactions, and the last
transaction rung up was 5000, then transaction 4898 is not in the .REC
file and cannot be written to the .CSV file.
Text data may not contain quote marks ("). Before being written to
the .CSV file all quotes will be changed to an apostrophe. Text data may
contain commas.
This program is [F4] compliant. This means that if you know how you
can program the main POS program to launch this program from the main
menu of the POS program by pressing [F4]. Then when this program is
finished you will be returned to the main menu of the POS program.
Remote viewing
The REMOTE.EXE program is used by managers to allow someone in the
office to view the sales being rung up on up to 6 networked registers on
the screen in real time. It allows managers to watch while the sales
clerks ring up items, discounts, reductions, price changes, etc.
The program screen has 6 windows. You set a PATH from this program to
any networked register for each window. Then when using the program you
will see the transactions being run up on up to 6 registers in real
time.
The program does this by capturing the pole display data being
created by each register. This works even if the registers to not have a
pole display, the data is created anyway.
While at any one time you can only see the data from 6 registers you
can store up to 15 PATHs and then assign any path to one of the 6
windows with a few keystrokes. When watching the windows if you press
[ESC] you can reassign a window from the list of PATHs without quitting
the program.
Previous page | Table of contents | Next page
CASH REGISTER HOME